Windows Reinstall Guide
Chapter 1 of 2 · Windows Reinstall
Guide · 8 steps
Windows Reinstall
A fresh Windows install removes all hardware ban traces from previous sessions. Optional but strongly recommended after a hardware ban.
Video Walkthrough
Watch the full Windows Reinstall guide
A complete screen recording covering downloading the ISO, creating a bootable USB with Rufus, and doing a clean Windows 10 install.
Download the Windows 10 ISO
Get the official ISO from Microsoft using the Media Creation Tool.
Download the Windows 10 ISO directly from Microsoft using the Media Creation Tool. This is the only official source — avoid third-party ISO downloads.
- 1
Click the download link below and navigate to the Microsoft page
- 2
Click Download Now under "Create Windows 10 installation media"
- 3
Run the tool, accept the license terms, and select Create installation media for another PC
- 4
Choose your language, edition, and 64-bit architecture — then select ISO file and save it
This will wipe your PC. A fresh Windows install removes all files, apps, and settings. Back up anything important before continuing.
Configure Rufus
Write the ISO to a USB drive with the correct partition settings.
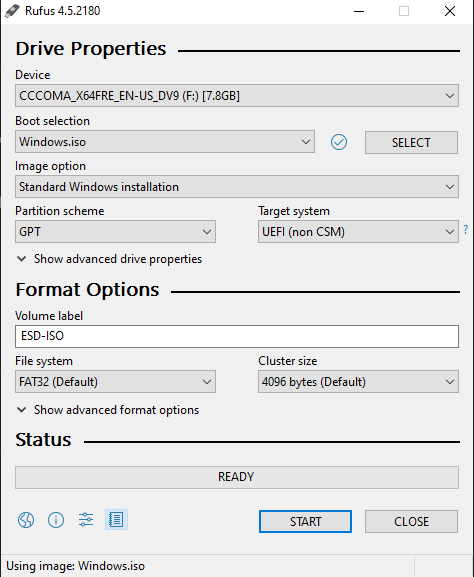
Use Rufus v4.5 to write the ISO to a USB drive (8 GB or larger). The partition scheme and target system must match the screenshot — wrong settings will prevent the PC from booting.
- 1
Open Rufus and select your USB drive in the Device dropdown
Make sure the correct USB is selected — this will erase it.
- 2
Click Select and choose the Windows 10 ISO you downloaded
- 3
Set Partition scheme to GPT and Target system to UEFI (non CSM), then click Start
Click image to expand
Windows User Experience Dialog
Configure the privacy and encryption options when the dialog appears.
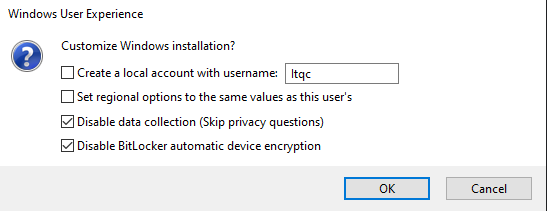
After clicking Start, Rufus shows a Windows User Experience dialog. Only enable the two options shown — these remove telemetry and prevent BitLocker from encrypting your drive during setup.
- 1
Check Disable data collection
- 2
Check Disable BitLocker automatic device encryption
- 3
Click OK and wait for Rufus to finish — the status bar shows READY when done
Do not remove the USB while writing. Wait for the status bar to show "READY" before unplugging the drive.
Click image to expand
Add Boot File to USB
Download and drag the required boot file into the root of the USB.
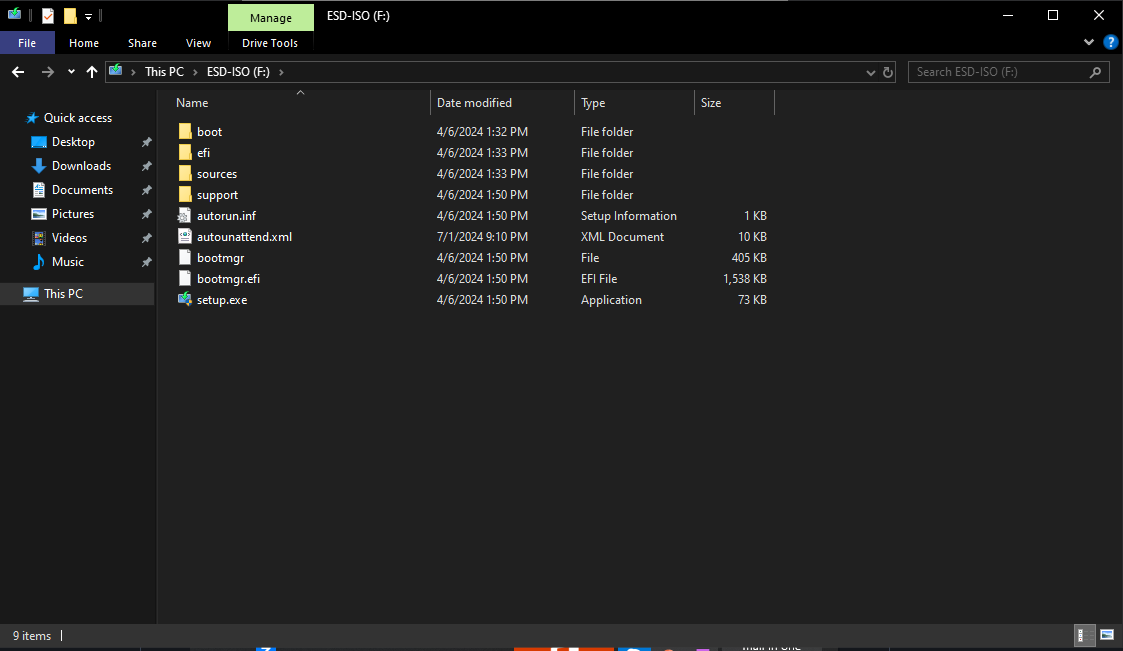
After Rufus completes, add one file to the USB root. This file is required for the custom Windows installation to work correctly — without it the install will fail.
- 1
Confirm the Rufus status bar shows READY before continuing
- 2
Download the USB Boot File using the link below
- 3
Open your USB drive in File Explorer and drag the file into the root of the USB (not inside any subfolder)
Click image to expand
Boot From USB & Select Edition
Restart into the Windows installer and choose Windows 10 Pro.
Restart your PC from the USB to enter the Windows installer. On most PCs, hold Shift while clicking Restart to access the boot menu.
- 1
Hold Shift and click Restart in the Start menu, then select your USB as the boot device
- 2
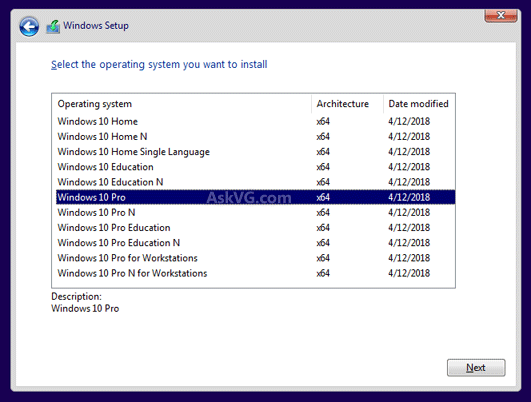
When Windows Setup loads, select your language and click Next, then Install Now
- 3
Choose Windows 10 Pro as the edition and click Next
WiFi users. Download your motherboard's network drivers onto the USB before starting. Find your model by pressing Win + R and typing msinfo32.
Click image to expand
Skip Product Key & Choose Custom Install
Skip the product key and select the advanced custom installation.
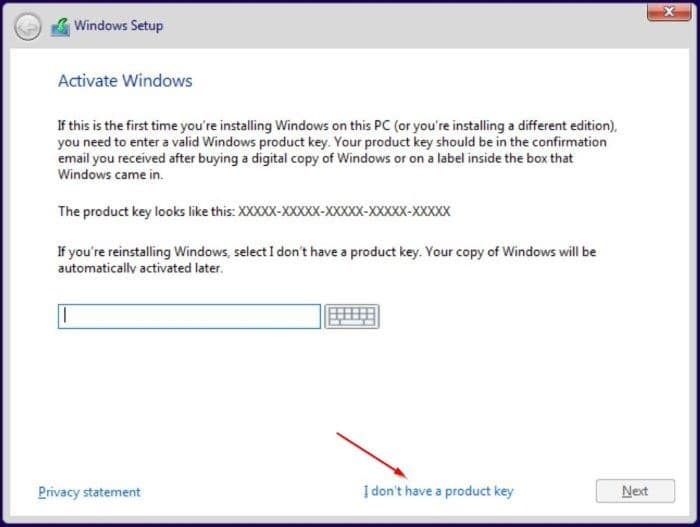
You don't need a product key to install. Windows will run unactivated — you can activate later or use it without activation for most purposes.
- 1
Select I don't have a product key
- 2
Choose Custom: Install Windows only (advanced)
Click image to expand
Clean Drive with Diskpart
Open CMD with Shift + F10 and wipe the drive using diskpart.
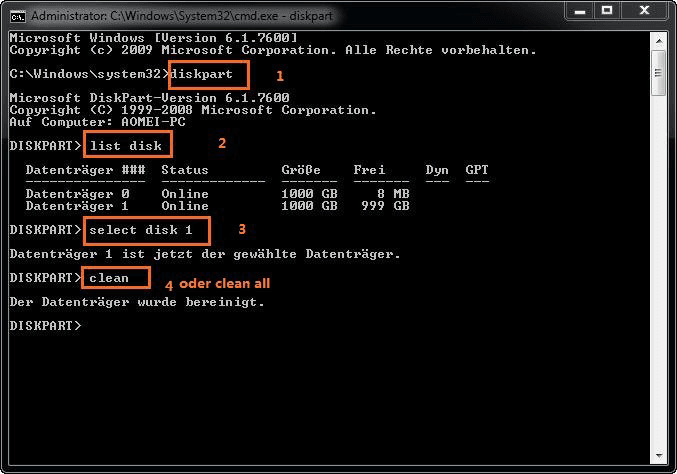
Use Shift + F10 to open Command Prompt inside the installer and run diskpart to fully wipe your drive. This removes all old partitions and ban traces before the fresh install.
- 1
Press Shift + F10 to open CMD, type diskpart and press Enter
- 2
Type list disk to identify your main drive, then type select disk N (replace N with your disk number)
Then type clean to fully wipe the drive
Click image to expand
Refresh, Select Drive & Finish
Close CMD, refresh the drive list, select your drive and complete the install.
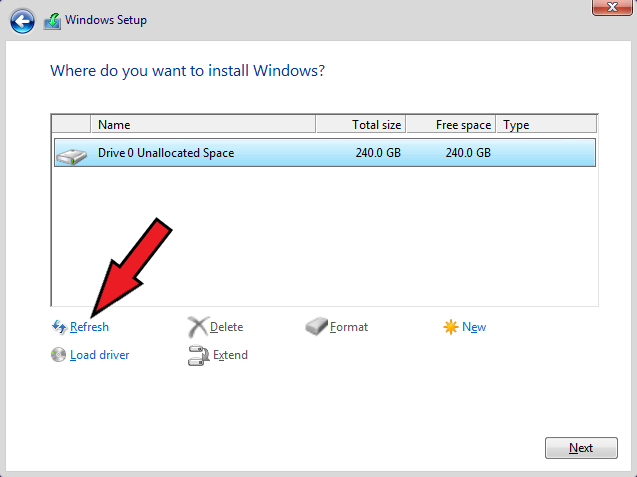
After diskpart wipes the drive, close CMD and refresh the installer drive list. Your drive will appear as unallocated space — select it and let Windows install.
- 1
Close the CMD window and click Refresh in the drive list
- 2
Select your main drive (now showing as unallocated space) and click Next
- 3
Continue with the setup and finish installing Windows
Click image to expand
Finish all 8 steps to complete
Mark each step done as you go. The section completes when all steps are finished.